In this post, we are going to see the basics of object detection in the computer vision, basics of famous object detection system YOLO (You Only Look once), and the installation procedure of the latest YOLO v4 in Ubuntu.
This post is indented for absolute beginners who don’t have much idea on implementing an objection detection system in Ubuntu
Table of Contents
Overview
- What is Object detection?
- When do we need Object detection?
- How YOLO work?
- Who created the YOLO Object detection?
- Why we use YOLO?
- What is Darknet?
- What are the different versions of YOLO?
- Installing YOLO v4 on Ubuntu 20.04
- Testing YOLO v4
What is Object detection?

Before discussing the object detection concepts, it will be good to start with the following concepts in computer vision.
Object classification: This technique predicts the probability of different object categories( car, dog, cat, etc.) in an image, it essentially answers the question “What is in the picture?”. It can only predict one category for one image.
Object localization: This method can predict the probability of an object in the image along with its location in the image. This technique basically answers “What is in the picture and where it is?“.
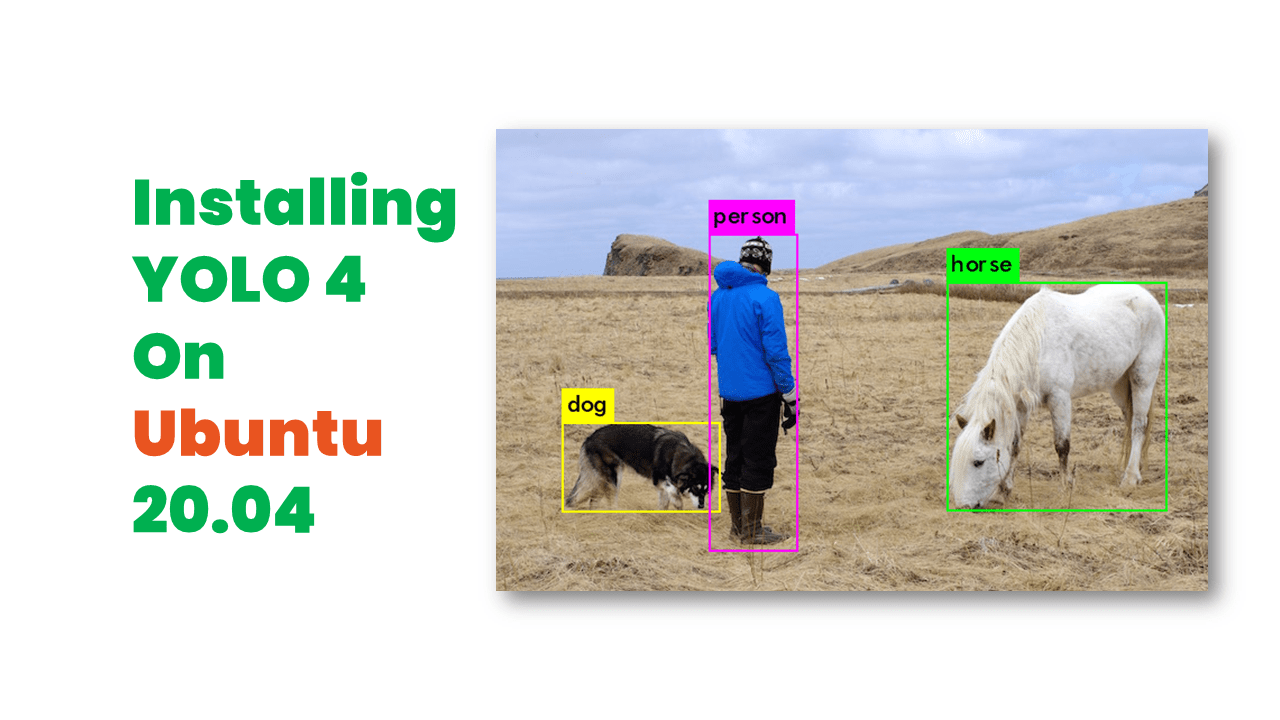
Object detection: The above two methods only cares about one object and its location. In a real-life scenario, we may have to find multiple objects from an image and its position.

For example, in self-driving cars, it has to detect various kinds of vehicles on the road, pedestrians, road signs, road signals, etc. The object detection techniques are dealing with multiple object classification and it’s localization. The object detector can draw a box around the detected object called ‘bounding box‘. You can able to see an example of object detection in the above diagram.

Instance Segmentation: Instead of detecting objecting and drawing bounding boxes, the instance segmentation algorithms can extract the actual object from the image. You can see from the above image that, the object detection algorithm draws a ‘bounding box‘ over the object, this technique will extract the exact object shape from the object. If you want to learn more about segmentation, you can follow this tutorial.
Each object class can be classified based on its features. The features in an image are some unique points and edges. In the object detection system, the detection algorithms separate the features of an image and classify it using some training algorithms. When the features feed to the trained algorithm, it can predict the features belongs to which category of object.
There are several feature extraction techniques and training algorithms available to do object detection. Currently, the famous methods for object detection are using Machine learning and deep learning-based approaches.
Machine learning approaches for object detection
- Viola-Jones object detection based on Haar features
- SIFT (Scale-invariant feature transform)
- HOG (Histogram of oriented gradients)
Deep learning approaches for object detection
When do we need Object detection?
There are many applications to object detection techniques. One of the famous applications is face detection and recognition. There are even commercial software products available in the market to do face recognition. Some of the main applications of object detection techniques are given in the following list.
- Optical Character recognition: OCR is the recognition of hand-written, printed, or typed characters from an image. These techniques are used for scanning printed books to a digital document. Other applications are data entry, traffic sign recognition, etc.
- Self-driving cars: These cars can drive by itself. One of the major capabilities of self-driving cars is detecting pedestrians, cars, trucks, traffic signs, etc. These detections are essential for the proper working of self-driving cars.
- Verification using face and IRIS code: Face and IRIS verification and authentication are used in iPhone and Android phones. It does the device authorization if the exact face or IRIS match detected.
- Robotics: There are a lot of applications in robotics using object detection. One of the common applications is bin picking and sorting of objects. Using object detection techniques, the robot can able to understand the location of objects. Using that information, the robot can able to pick the object and able to sort it.
- Object tracking and counting: Using object detection techniques, you can track an object and can be used as an object counter. For example, how many cars have crossed in a junction, how people entered a shopping mall etc.
What is YOLO object detection?
As you have seen from the Object detection section, YOLO is one of the ‘Deep learning-based approach‘ of object detection. The object detection algorithms using deep learning can be classified into two groups
- Classification based algorithms: There are mainly two stages in classification based algorithms. In the first stage, it will select a bunch of Region of Interest (ROI) in the image where the chances of objects are high. In the second stage, it will apply a Convolution Neural Network to these regions to detect the presence of an object. One of the problems with this method is, we have to execute the detector in each of the ROI, and that makes is slow and computationally expensive. One example of this type of algorithm is R-CNN.
- Regression-based algorithms: In this algorithm, there is no selection of interesting ROI in the image, instead of that, it will predict the classes and bounding boxes for the entire image at once. This makes detection faster than classification algorithms. One of the famous regression-based algorithms is YOLO (“You Only Look Once“). The YOLO detector is very fast so it is used in self-driving cars and other applications where real-time object detection is required.
How YOLO work?
Here are the fundamental concepts of how YOLO object detection can able to detect an object.
The YOLO detector can predict the class of object, its bounding box, and the probability of the class of object in the bounding box. Each bounding box is having the following parameters.
- The center position of the bounding box in the image (bx, by)
- The width of the box( bw )
- The height of the box ( bh )
- The class of object ( c )

Each bounding box is associated with a probability value ( pc ), it is the probability of a class of object in that bounding box.
As we have seen earlier, the YOLO is not looking for interesting ROI, instead of that, it is splitting the image into several cells typically using a 19×19 grid. Each cell is responsible for predicting 5 bounding boxes (there can be one or more objects in a cell). If it does that, it will finally end up in 1805 bounding boxes for one image.

Most of the bounding boxes in the cell may not have an object. The filtration of these bounding boxes is done based on the probability of object class pc. The non-max suppression processes will eliminate the unwanted bounding boxes and only the highest probability bounding boxes will remain.

Who created the YOLO Object detection?
The actual author of the YOLO Object detector is Joseph Chet Redmon. Here are some of his web presence so that you can connect with him

Here are some of his famous TEDx talk
This is one of his YouTube course on Computer Vision
The official website for YOLO object detection project is given below
Official YOLO Website
Why we use YOLO?
Here are some biggest advantages of YOLO compared to other object detection algorithms.
- Very fast (45 frames per second – better than real-time)
- Light and faster version: YOLO is having a smaller architecture version called Tiny-YOLOwhich can work at higher framerate (155 frames per sec) with less accuracy compared to the actual model.
- The network understands a generalized object representation meaning the real world image prediction and artwork are fairly accurate.
- The YOLO object detection is free and opensource
What is Darknet?

There are very few implementations of the YOLO algorithm that exists on the web. The Darknet is one such open-source neural network framework written in C and CUDA and serves as the basis of YOLO. It is fast, easy to install, and supports CPU and GPU computation. Darknet is used as the framework for training YOLO, meaning it sets the architecture of the network. The first author of Darknet is the author of YOLO itself(J Redmon).
The official git repository of Darknet can be found here
Darknet Official Git Repository
What are the different versions of YOLO?
As of now, there are four different versions of YOLO got released, From YOLO v1 to YOLO v4. Let’s have a brief overview of each version.
You can download all YOLO paper from the following link
YOLO v1
The first research paper about YOLO was published CVPR May 2016, and it got the OpenCV People’s Choice award. Given below the talk he has delivered at CVPR.
The YOLO is a network was “inspired by” GoogleNet. It has 24 convolutional layers working for feature extractors and 2 dense layers for doing the predictions. This architecture works upon is called Darknet. There is a fast version of YOLO called “Tiny-YOLO” which only has 9 convolution layers.
YOLO v2
YOLO v2 (Dec 2016) comes with some improvements from the first version. One of the shortcomings of the first version was, it is not very good at detecting objects that are near to the image and create mistakes in localization. One of the new things introduced in YOLO v2 is anchor boxes.
YOLO v3
YOLO v3 released in April 2018 which adds further small improvements, included the fact that bounding boxes get predicted at different scales. In this version, the darknet framework expanded to 53 convolution layers.
YOLO v4
The YOLO v4 released in April 2020, but this release is not from the YOLO first author. In Feb 2020, Joseph Redmon announced he was leaving the field of computer vision due to concerns regarding the possible negative impact of his works.
The YOLO v4 release lists three authors: Alexey Bochkovskiy, the Russian developer who built the YOLO Windows version, Chien-Yao Wang, and Hong-Yuan Mark Liao.
Compared with the previous YOLOv3, YOLOv4 has the following advantages:
- It is an efficient and powerful object detection model that enables anyone with a 1080 Ti or 2080 Ti GPU to train a super fast and accurate object detector.
- The influence of state-of-the-art “Bag-of-Freebies” and “Bag-of-Specials” object detection methods during detector training has been verified.
- The modified state-of-the-art methods, including CBN (Cross-iteration batch normalization), PAN (Path aggregation network), etc., are now more efficient and suitable for single GPU training.
Installing YOLO v4 on Ubuntu 20.04
The first step in building/installing YOLO v4 on Ubuntu is installing its dependencies. Here I am assuming that you have a freshly installed Ubuntu 20.04 installation which is only having default installed packages.
Note: If you have already installed the ROS framework, Open-CV, you don’t need to install it again as the prerequisites. It may break the existing packages.
Installing YOLO Prerequisites
Here are the important prerequisites of YOLO.
We can run YOLO either in CPU or run with GPU acceleration. In order to do GPU acceleration, you may need a good Nvidia based graphics card with CUDA cores.
Use the following command to install the prerequisites, you can find the explanation of each one after that.
- CMake >= 3.8
- CUDA 10.0 (For GPU)
- OpenCV >= 2.4 (For CPU and GPU)
- cuDNN >= 7.0 for CUDA 10.0 (for GPU)
- OpenMP (for CPU)
- Other Dependencies: make, git, g++
CMake >= 3.8 (for modern CUDA support)(CPU and GPU)
The Ubuntu 20.04 is having CMake version 3.16, we can install this using apt package manager.
Installing CMake in Ubuntu 20.04
sudo apt install cmake For checking your CMake version, you can use the following command
cmake --versionIt will give you following output.

CUDA 10.0 (For GPU)
You can install CUDA if you have a GPU from NVIDIA, adding GPU for YOLO will speed up the object detection process.
CUDA is a parallel computing platform and application programming interface model created by Nvidia. It allows software developers and software engineers to use a CUDA-enabled graphics processing unit for general purpose processing.
Here are the tutorials to install CUDA 10 on Ubuntu.
Download and install CUDA 10 Toolkit
How to install CUDA on Ubuntu 20.04 Focal Fossa Linux
OpenCV >= 2.4 (For CPU and GPU)
OpenCV is a library of programming functions mainly aimed at real-time computer vision. Originally developed by Intel, it was later supported by Willow Garage then Itseez. The library is cross-platform and free for use under the open-source BSD license.
Note: The OpenCV is an optional install YOLO, but if you install it, you will get a window system to display the output image from YOLO detection. Otherwise, the output image from YOLO will be saved as an image file. I have enabled OpenCV for this tutorial so that you can see the output of YOLO in a window.
You can install OpenCV in Ubuntu using the apt package manager or using compiling the source code.
Installing OpenCV using package manager
Here is the command to quickly install OpenCV and its Python extension using the apt package manager.
sudo apt install libopencv-dev python3-opencv Installing OpenCV using source compilation
If you want to customize your OpenCV installation, you can try the source compilation.
After installing OpenCV, you can find the existing version of OpenCV using the following command
opencv_versioncuDNN >= 7.0 for CUDA 10.0 (for GPU)
The NVIDIA CUDA® Deep Neural Network library (cuDNN) is a GPU-accelerated library of primitives for deep neural networks. cuDNN provides highly tuned implementations for standard routines such as forward and backward convolution, pooling, normalization, and activation layers.
Here is the installation procedure for cuDNN.
OpenMP (for CPU)
OpenMP uses a portable, scalable model that gives programmers a simple and flexible interface for developing parallel applications for platforms ranging from the standard desktop computer to the supercomputer.
Here is the command to install OpenMP in Ubuntu 20.04
sudo apt install libomp-dev Other Dependencies (For CPU and GPU)
Here are other dependencies used for CPU and GPU configuration.
sudo apt install make git g++ Downloading YOLO v4
You can download the YOLO v4 using following command
git clone https://github.com/AlexeyAB/darknetBuilding YOLO v4
You can build the YOLO v4 using Make and CMake command.
In this tutorial, I have setup YOLO v4 in my PC with the following configuration.

I have tested YOLO v4 in GPU and CPU configuration. You can find the detailed video at the end of this post.
Building YOLO v4 using Make
Switch to the darknet folder after download. Open the Makefile in the darknet folder. You can see some of the variables at the beginning of the Makefile. If you want to compile darknet for CPU, you can use the following flags.

For CPU build
Set AVX=1 and OPENMP=1 to speedup on CPU (if an error occurs then set AVX=0),
Set LIBSO=1 will create the shared library of the darknet, ‘libdarknet.so‘, which is used to interface darknet and Python.
Set ZED_CAMERA=1 if you are working with ZED camera and its SDK
GPU=0
CUDNN=0
CUDNN_HALF=0
OPENCV=1
AVX=1
OPENMP=1
LIBSO=1
ZED_CAMERA=0
ZED_CAMERA_v2_8=0
For GPU build
set GPU=1 and CUDNN=1 to speedup on GPU
set CUDNN_HALF=1 to further speedup 3 x times (Mixed-precision on Tensor Cores) GPU: Volta, Xavier, Turing and higher
GPU=1
CUDNN=1
CUDNN_HALF=1
OPENCV=1
AVX=0
OPENMP=0
LIBSO=1
ZED_CAMERA=0
ZED_CAMERA_v2_8=0
After doing these changes, just execute the following command from the darknet folder.
makeIf everything works fine, you may get an output as shown below.

After build, you can able find darknet and libdarknet.so in the build path.

Building YOLO v4 using CMake
You can build darknet using CMake build. Just follow the commands below in order to build from CMake.
Note: The commands should be executed from inside the darknet folder.
mkdir build_release
cd build_release
cmake ..
make
If the build is successful, it will create the following files inside the build_release folder.

After building those files, copy the darknet and libdark.so from the build_release folder to the darknet folder. You also have to rename
libdark.so -> libdarknet.so
to test the darknet Python scripts.
Testing YOLO v4
After building YOLO, let’s test the working of YOLO v4. To test the darknet, first, we have to download a pre-trained model. The following model is trained for the MS COCO dataset.
After downloading the yolov4.weights, copy to the darknet folder. Now make sure that you have the following files in the darknet folder.

Now open a terminal from the darknet folder by right-clicking on the folder and execute the following commands.
Testing YOLO v4 in a single image
The command below is for running YOLO in a single image. Both of the commands mentioned below do the same functions. The first one is for detection from one image, the second one is for multiple use cases, for eg. detection from video and webcam.
Version #1

./darknet detect cfg/yolov4.cfg yolov4.weights data/person.jpg

Version #2

./darknet detector test cfg/coco.data cfg/yolov4.cfg yolov4.weights data/person.jpg -i 0 -thresh 0.25
The darknet is the executable that we are getting when we build the darknet source code. Using this executable we can directly perform object detection in an image, video, camera, and network video stream.
Here yolov4.weights is the pre-trained model, cfg/yolov4.cfg is the configuration file of the model. The data/person.jpg is the input image of the model.
The 2nd command is providing the configuration file of COCO dataset cfg/coco.data, the ‘i=0‘ mentioning the GPU number, and ‘thresh‘ is the threshold of detection. The accuracy of the detection will vary if you vary this value. By default, YOLO only displays objects detected with a confidence of .25 or higher.
You may get following output if everything is successful

You can able to see the confidence of detection from the terminal.
Instead of data/person.jpg, you can try with
data/eagle.jpg
data/dog.jpg
data/person.jpg
data/horses.jpg
Testing YOLO v4 in a Video
Download a test video from the following link
Copy the test video test50.mp4 into the darknet folder, and test YOLO in a video using the following command.
./darknet detector demo cfg/coco.data cfg/yolov4.cfg yolov4.weights test50.mp4 -i 0 -thresh 0.25You may get an output as shown below.

Testing YOLO v4 using Webcam
The following command will start the YOLO detection using your webcam
./darknet detector demo cfg/coco.data cfg/yolov4.cfg yolov4.weights -c 0The option c here is for camera index. The above command will open the first camera. Here is the output of the detection

You can able to read more about the usage of the darknet, Tiny YOLO, and training YOLO for a custom object from the official YOLO website itself.
YOLO v4: Testing video of YOLO v4 on Ubuntu
Testing YOLO v4 in NVIDIA Jetson Nano board

Here are the test results of a single image from Jetson Nano. It can detect from one image and it roughly takes 1.2 sec. It will not work well with video and webcam, the FPS ~1. If you want to work with Jetson Nano and YOLO, try with YOLO v3 tiny 3 cfg and YOLO v3 weights. You will get FPS between 25 to 30.


Further Reading
- Computer vision and object detection
- Fundamentals of YOLO
- Latest news: YOLO v4
- Different YOLO versions
- Original YOLO v3 Github
- YOLO v4 on Github
Summary
In this tutorial, we have gone through the basics of YOLO object detection algorithms, the different versions of YOLO, installation, and testing of the new YOLO v4 version.
If you have more questions, you can comment below.
Hi Joseph , Nice article on Yolo and its versions .
I have installed and tested Yolo4 .
I would like to know , can i use Yolov4 for detecting an object of size smaller 30×20 in an image frame from 2MP 1080P camera. (live stream) .
what are the things i have to follow to do so .like a) training smaller objects of that size b) any changes in code or anchor box selection . etc.
Thank you in advance .
@Anil
Regarding object size, I have tried with 40×40 image with a face and its working.
I think there are no special steps to follow for training small objects. The procedure of training is the same.
Hello Joseph, Thank you for this great tutorial. I have tried to implement the yolov4 but I am not able to make the detection. the testing fails. After running the code, it ends with KILLED. Also I would like to clarify something. The darknet and libdark.so files we have to copy from the build_release folder to the darknet folder, they already exist in the darknet folder. so if I am right, we have to replace them with those from the build_release folder. Thanks
Hi @Savadogo
If the libdarknet.so is already generating after making command, you don’t have to run the CMake. Please post the error that you are getting. Please test darknet on an image then test video.
Hi Lentin, thanks for the informative article!
I would like to know, is it possible to use YoloV4 efficiently on android mobile phones to detect objects in real time (slight delay of detection is okay)?
common objects like cars/people with trained yolo (or does it require new training)
Thanks!
Hi Naor
Yes, you can deploy yolo in android. I think following link may help
https://github.com/natanielruiz/android-yolo
Hello Joseph,
Thanks for these explanations.
I ma very interested by Yolo so I have adapted to TensorFlow 2.x the last release v4 of the famous Deep Neural Network Yolo.
You can find more details here:
https://github.com/RobotEdh/Yolov-4
@robotedh Thats cool
how to export the bbox info and save to a text file? along with the object name and confidence.
not only show on terminal but save it to a text file.
Hey
I think you can use the Yolo python wrapper in order to get the bbox info. An example of python wrapper is present in the darknet folder itself.
I can run the original repo on google colad. however when I train my own data, following the instruction on yolov4 github.
got error below:
138 Cuda malloc failed
File exists
darknet: ./src/utils.c:326: error: Assertion `0′ failed.
anyone knows the possible reason?
I’m facing the same error. Have you been able to figure out the solution for this issue?
@Lentin, it would be great if you can give some inputs on this. Thanks a lot!
Hello Joseph,
Thanks for these explanations of yolo versions
I actually work in poject of object detection in changing environmental factors so what is best vorsion bitween yolo V3 and yolo V4 of object detection on the fog and Dust and .,.
THanks
Hi @aymene
Yolo v4 claims lot of performance improvement over Yolo v3. I think you can think about working with v4 and check its results.
Great tutorial, spent days tracking down Cuda error codes, cudnn, lcudnn errors and whatnots. Your guide worked perfectly the first time.
Hello Joseph,
May I ask how to speedup the jetson nano?
I use the Yolov3-tiny at jetson nano with webcam, but I only get 5~6 FPS.
Thanks
Hello Joseph,
How can I speedup the jetson nano? I run the yolov3-tiny on jetson nano but only have 9 FPS.
Thanks
if I want to use yolo v4 pytorch for object detection
Hi I use same command to run ./darknet, still got
GPU isn’t used
Not used AVX
Not used FMA & AVX2
OpenCV version: 4.5.3
Illegal instruction (core dumped)
why?
Good job Lentine,
This is a very good example on how to show something easily and clearly. I really appreciate your effort. The things you did needs a lot effort and you make it seem very easy.
The one thing that is boggling my mind is how to write the result to a relational database. Can you say more on that? I am building a system as my graduation project and as you can imagine your tutorial is the center piece of the project.
Hello,
the Google Cloud link behind the Button “Download YOLO v4 Model” seems to be offline. I get a Message that says “file does not exist” is there a backup somewhere?
Thanks in advance.